Search Results
394 results found with an empty search
- Temporary home studio part VI
This was my last FIne art Nude session to date, and not the last one I will do (never say never) but I don’t think I will do many of these this year. They were fun for me to make as long as I was able to find a common ground with my clients, or if it brought something fresh to my portfolio. I realized my last sessions didn’t meet these requirements. If I don’t learn anything, if I am not inspired, if I just feel I am clicking a button, then I have to move on. This doesn’t mean I will not come back to the genre later, but for the past 5 years, I tried to follow my heart, even if this meant making difficult business decisions. This session happened during my stay in an apartment in Toulouse last year. It’s crazy how time flies by. These are the other sessions I posted here: Temporary Studio Part I Temporrary Studio Part II Temporary Studio Part III Temporary Studio Part IV Temporary Studio Part V
- WGTF?! 2024
The 2nd to last! 7 years since I’ve stopped covering events... Except for this one that I do every year. It's always a joy to be surrounded by talented individuals. Incredible dancers from around the world, 3 days of good vibes, and we were lucky this year that the rain barely showed up during this festive event. We are in Pontcharra, not far from Grenoble, surrounded by mountains. The festival remains a one-of-a-kind event, the one you cannot miss, the one you must experience at least once in a lifetime. It's also an opportunity to meet up with a team I only see once a year, it almost feels like a family gathering. The festival was packed like every year, you can come across all kinds of people of all ages and backgrounds, and that's the beauty of this festival. The Collab and The 4vs4 are the 2 highlights of this event. The Colab is a concept created in 2016 that combines hip-hop dance and live music, putting musicians and dancers on the same level. Eight duos, a dancer and a musician randomly paired together. Musicians and dancers evolve together, one accompanying the other. After each round, the winning team takes the opposing team's musician(s) . Once we reach the finals, you end up with a dancer and four musicians on both sides battling for the title! The 4 vs 4 breaking Battle shifts the mood inside the Coléo the next day. They managed to still make it fresh after 9 years. The world's best dancers face off in wild battles! Some of the best break dancers in the world meet in Pontcharra every year. The Collab and the 4vs4 battle are the main attractions, but there is so much more going on outside in the hip-hop village. 7 to smoke The concrete Battles The Hip-Hop Village & Skate Jam… The WGTF?! is also a place to learn and develop your skills as a dancer. The Workshops And of course, you need to release the steam at the end of the day! The Afterparties & Concert 2025 will mark the festival's tenth anniversary... and probably my final year as the main photographer of the event. As much as I love the festival, as the years go by, I feel I no longer can give my best as a photographer for 3 days. Plus, my usual work is very different from this type of exercise, so I feel that others whose specialty it is will be more relevant and able to give a fresh perspective every year. Whether it is with or without my camera, there is a great chance I will be present next year... Will I see you there? Huge shoutout to all the staff and crew that made this Festival what it is through the years. Thank you Next Tape and Geo for inviting me each year. The entire event was photographed with two Fujifilm X-H2s paired with the XF 16-55mm f/2.8 R LM WR and XF 8-16mm f/2.8 R LM WR except a few shots made with Viltrox lenses. Learn more about the festival: https://en.wgtf.fr/ Experience the festival on their YouTube channel: https://www.youtube.com/@WGTF They made it happen:
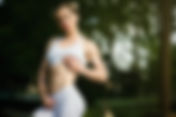
- Urban Fitness Photoshoot
Feat. Clara P. & The Viltrox 56mm f1.4 If you wish to see more images made with the Vitrox 56mm lens, check out my previous post! Viltrox is doing an excellent job these days, and this 56mm is no exception, especially if you look at its price… But how do they do it? To have such a cheap, compact, and lightweight 56mm lens you have to make a few compromises. The VILTROX 56MM F/1.7 AF FUJI XF isn’t labeled as a PRO lens and there is a reason for that. It is not weather-sealed and doesn’t have that tough rugged feel the 75mm has, but it still feels solid. Still, I can see myself using it for professional shoots. During my first session with the lens, I used it alongside the X-H2s and the 75mm and 16 - 55mm lenses.
- Workshop Numériphot & Godox
Why did it take so many years for me to do a proper workshop in Toulouse? Probably because very few people know I live there. Some think I am still living in Strasbourg, others think I am hidden somewhere in Paris. But no I’ve been living in the pink city for over 5 years now and apparently, I should be staying around for a bit. I wasn’t even sure my wife and I would stay here this long and this is probably why I haven’t made any effort to get to know the city and bond with the people here. COVID didn’t help either, and my latest health issues got me staying a home for several months earlier this year. But here we are, maybe this is the beginning of a new start, who knows? Just like the Workshop in Nancy, this one was made possible thanks to Numeriphot , Godox, and last but not least Numeriphot, my go-to photography store in Toulouse. Workshop Miss Numérique (Nancy) Like any of my past workshops, my goal was to share my experience, show how I interact with my models, how I direct them, and the basics of how I build a simple image using artificial lights from flash to LED lights. Communication is key, so it’s always at the heart of my workshops, and I always have a simple approach that can be understood by amateurs and still be inspiring for more experienced photographers. I once again was accompanied by Angelina Rakova, who you may have seen in my work before: BTS Dance portrait photoshoot The GF20-35mm experience Studio work is not my Forte, I try to avoid working in studios feeling that I am much more comfortable and creative on location or outdoors. But I’ve been doing home studio and studio work more in the past years since I started doing more traditional portraits. Gear-wise, I worked once again with the Fujifilm GFX100II. The GF55mm stayed on most of the time, with some shots made with the GF80mm. I had the GF110mm and also the GF20-35mm lens in my bag. The GF110mm is usually my go-to portrait lens, but with around 15 other folks around, the crew, and all the light stands and accessories, the GF55mm was the best choice, for maximum freedom. So remember that it wasn’t an artistic choice, it just made my life easy on set that day. The studio is big enough to use the GF80mm and even the GF110mm for full-body shots if it's not packed. For the flash setups, I used the 2 X AD600pro and a QT400III. For my key light I used my favorite light modifier the Parabolic P128 and 2 X Godox Stripboxes. For the led setup I ended up playing with only 2 lights, the Knowled M600D as my key, used with the P128, and the SZ300RGB placed inside the QR-P90. They all had a sheet of diffusion and grid that went intermittently depending on the needed scenario. Here are a few images from the workshops, and the rehearsal , the selection illustrates the different lighting setups we utilized: Angelina Rakova (Numériphot Toulouse - France) Fujifilm GFX100II + GF80mmF1.7 R WR 1/200sec f/1,7 ISO 50 From one flash to 2 and finally 3. Placement is everything, and sometimes one light is enough. For something moody and with lots of contrast positioned the lights away from the backdrop and placed a sheet of diffiusion and a grid for more control. Angelina Rakova (Numériphot Toulouse - France) Fujifilm GFX100II + GF80mmF1.7 R WR 1/125sec f/4 ISO 50 The "Sandwich" I hope I am the only one who uses that term, I just love how it sounds, and it is self-explanatory. The model is caught in between 2 light sources! Angelina Rakova (Numériphot Toulouse - France) Fujifilm GFX100II + GF80mmF1.7 R WR 1/160sec f/2 ISO 50 And finally, for more control over your shadows, you can introduce a Third light. For the following image 2 strip boxes are placed on either side of my model and the P128 with a sheet of diffusion is placed behind my back at a low setting. This last source is used to fill in the shadows. Angelina Rakova (Numériphot Toulouse - France) Fujifilm GFX100II + GF 55 mm f/1,7 R WR 1/320sec f/4 ISO 250 So many options, and combinations are possible with already 2 lights. But you can go even further by throwing colors in the mix. This could be the topic of a future workshop, it was hard to decide on the day, as there are so many possibilities, and so many paths we can explore. I simplified the setup for the images created with LED lights. I just changed the color of one light and set it at 3200K and the other one is a Daylight balanced light. The advantage of continuous light is that you can right away see the results and place your lights much faster. Angelina Rakova (Numériphot Toulouse - France) Fujifilm GFX100II + GF 55 mm f/1,7 R WR 1/800sec f/4 ISO 640 I improvise a lot (maybe too much) during my workshops. This is due to the changing audience from one session to another. We had a little bit of spare time in the afternoon, so I asked the attendees to join in and help me out with a simple "fake" dress image. Angelina Rakova (Numériphot Toulouse - France) Fujifilm GFX100II + GF20-35mmF4 R WR 1/400sec f/4 ISO 250 at 35mm I would like to thank the entire Crew at Numeriphot , I had a lot of fun doing these. Thank you Sacha for the Makeup ( @sachamakeuppro ), and a shoutout to Ryan my assistant of the day Léa ( @lr_audiovisuels ) who was kind enough to make a few backstage pictures for us. Last but not least, thank you GODOX and Miss Numérique, I hope to see all of you guys again soon.
- Flycam G-Axis Carbon Fibre Stabilizer
First hands-on An Affordable steadicam system, that will help you smooth out your shots and more. This summarizes in a way the video. I don’t always film with a gimbal, and I use a steadicam with a vest only on occasion. Only when the shot calls for it, or when I know I will have to carry a few Kgs around for long periods. I was tired of having sore arms and back pains after a long day filming. So this was potentially the solution for me. I trust Proaim for a few things now. My dolly system and my apple boxes are from them, and as of today, I’ve been more than satisfied with their products. So when I had to consider owning a system like this, they were my first choice. Proaim Apple Boxes Proaim Dolly I needed a compact, light, and sturdy system, something I could take apart and carry rather easily on location. And of course, it had to be affordable as this would be my Stabilizer because let’s not kid ourselves there is a reason why camera operators exist. If there is a decent budget, I wouldn’t operate myself. But still, I was curious to see how this tool would help me for my projects, I am currently in a phase where I want to know as much as possible about the art of Filmmaking. Of course, there is a learning curve. And it took me a while to get used to the system. Setting it up, finding the right components that fit my style, and learning how to use it… I am not there yet. That’s why I had to practice and use it as much as possible to get those clean shots. This considerably reduces the bounce movement of the camera. It sometimes feels that I am on dolly tracks or a tripod. This opens new possibilities and will enrich your vocabulary. The arm is probably the most impressive part of the system. No plastic there, it feels strong. You have Two sets of springs depending on the weight of your setup. The vest is well made too, If I had to complain, I wish the buckles were not plastic, but so far they have done their job. It feels comfortable and will push me to favor heavier setups… not that I want to. Still, I own a few lenses and accessories that unfortunately add considerable weight to my camera, so if I need to move my camera and create those gliding smooth shots this will greatly help me do that. But let’s face it, I also use this whenever possible and when needed, when I know I will be shooting for a long time. My arms thank me for that, my back to… And I am a guy with serious back problems. The Steadicam itself is very streamlined, nothing fancy, the bare minimum to make it functional is there. It’s super light because of carbon tubes and all you need is this simple tool provided in the bag to adjust the length of every part. I have an additional set of weights just in case, and as I said earlier, everything comes in a bag for easy transport. All of this package is available as of today under 1k. You will probably see this bad boy more in action in a future BTS video… but more about that when the time is right. I have to train a bit more. Get yours: Flycam G-Axis Carbon Fibre Stabilizer with Vista-II Arm & Vest
- Nyamgerel Gankhuyag Portrait session
Complete Behind the scenes Last photoshoot session of that day, with Nyamgerel... an amazing Handstand performer and contortionist, currently performing for the Cirque du Soleil's show OVO. All the setups used for the first sessions earlier that morning were used that afternoon. I prioritized the use of only one light as I favor the dramatic look overall for all three sessions. Again, I only used a 2nd light to lift the shadows and recover some details. So I advise you to watch and read the 2 previous articles: Nansy Damianova Portrait session Danira Quintanar Portrait session
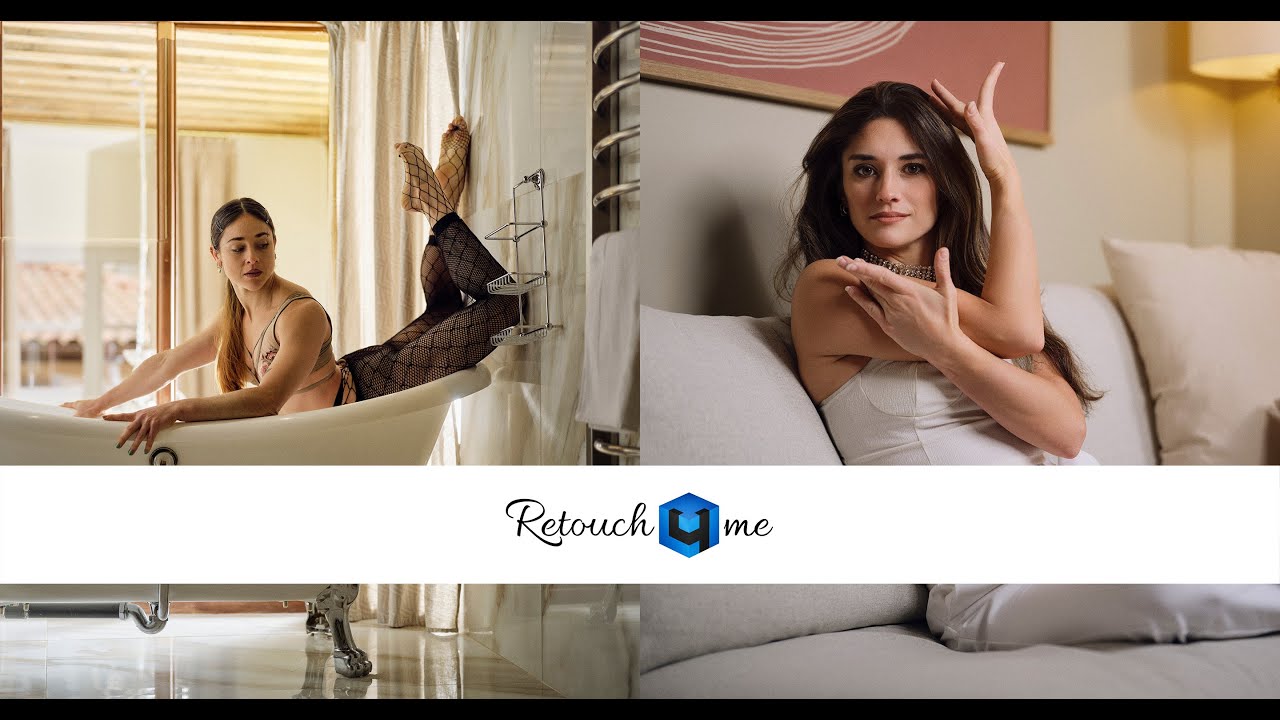
- Photoshop's best companion
RETOUCH4ME, another AI retouching program? A market that keeps on growing… Retouching assisted by Ai, further reduces your time in Photoshop and helps you deliver these images fully retouched to your client much faster. I’ve shared my experience with EVOTO Ai , a standalone solution in a past article. It has strong features but it doesn’t quite fit my workflow. So how is retouch4me different… and how does it perform? It took me some time to wrap my head around Retouch4me because the approach is completely different from EVOTO AI . One one hand, Retouch4me is a series of plugins used within Photoshop for retouching. On the other, EVOTO Ai is used as a stand-alone software for retouching and color grading. When you head to Retouch4me 's website, you have to choose which plugins you need and buy each one individually. Once bought it’s yours to use. With EVOTO Ai you pay for each photo you export by buying some credits upfront, one credit equals one export. I have been using PS for more than a decade now and I won’t step away from ADOBE’s software for now. So EVOTO wasn’t ideal for me as I had to open another separate software. Retouch4me meets me halfway. I barely change my workflow, from a capture one session I open my file in Photoshop for editing and usually start dealing with any skin problems I may have on a portrait. I use the frequency separation technique most of the time, I would then do a bit of dodging and burning, localized (face and body), and then general over the entire image. This may take some time, it's different for every image, and it’s the least fun part of the process for me. This is why I got myself the Heal, the Dodge and Burn, and Volume plugins… and on top of that the Mattifier plugin... just in case. These are all I need for the majority of my work. One may argue and say that EVOTO proposes a bunch of features in one single package, which is true. However, I found myself using only half the features of the program (at best). I am in a phase where I wish to step back. this means a moderate and subtle approach to the amount of retouching applied to an image. And this is why Retouch4me suits me better at the moment. So how does it perform and how do I use it? It’s easy, like any plugin just open the one you need, and adjust a single slider for the desired effect. I choose to use the mask or soft layer function, and once you press apply, it does the work for you. You can then reduce the opacity of your layer, or even add a mask if you wish to reduce or erase the effect on specific parts of the image. My priority was to optimize my current workflow and this is a real-time saver for me. It does a fantastic job most of the time. With some of my bendy models, the effect is at times less effective. But on regular portraits, I barely have to modify anything and can move on to the color grading part. Some before and after (not color-graded) The Mattifier plugin, helps me reduce shine or harsh highlights. I don’t use it all the time but it came in handy on some of my recent images. So you guessed it, it’s a matter of workflow. In the end, most of the software I tested, delivered great results. If you use Photoshop, If you wish to have a natural approach in your retouching, and if you usually work on a small number of files per session, then you are a bit like me and Retouch4me might be your best bet. If you work with high volumes and need fully retouched photos on huge sessions. Then you might look away as other solutions will help you deal with that better. I may take a closer look at their other plugins, but for now, these are all that I need. Check out the links below for a discount and some useful links. Like always all the galleries are on the blog and the the scenes video of these sessions are also there… So if you are interested in that you know what to do. I guess that I will catch you in the next one, take care, and until then, have a good one. Get 20% discount: CLICK HERE
- Not your usual portrait session
3 Cirque du Soleil, artists one apartment I'm getting more and more tired of seeing my face on the screen. I'm slowly transitioning to a new formula. To be honest, I don't think I'm doing you any favors by providing more information. So for this new Behind-the-scenes video featuring 3 amazing artists from the Cirque du Soleil, we're going to keep it simple. Let me explain. It’s all there. Does gear matter? Not so much, the most important part is my lighting placement, the general setup, and staging. Then of course the result, where I advise you to head to my blog to see the images in better quality and further analyze the result. The rest is for you to experiment. The only way in my opinion to learn and make significant progress is by experimenting in the field. These videos should only be there to inspire and eventually open new doors. 1st image: Nansy (Toulouse - France) Fujifilm GFX100II + GF 55mm f/1.7 R WR 1/250sec f/1.7 ISO 125 2nd image: Danira Same settings 3rd & 4th image: Nyamgepel Fujifilm GFX100II + GF 55mm f/1.7 R WR 1/200sec f/1.7 ISO 200 The gear I am using, camera settings… you have everything on the blog. For this session, I had the Fujifilm GFX100II, the GF20 - 35, GF55, GF80, and the GF110mm lenses. What more do you need? Oh, I forgot, 2 flashes were used, an AD300 pro and an AD600pro. I brought two umbrellas this time for convenience and one layer of diffusion plus the AD-S65S softbox with a grid. 1st image: Danira (Toulouse - France) Fujifilm GFX100II + GF 20-35 mm F/4 R WR 1/200sec f/4 ISO 320 at 35mm 2nd image: Nyamgepel Fujifilm GFX100II + GF 55mm f/1.7 R WR 1/200sec f/1.7 ISO 200 The light coming from the windows was constantly changing during the session, so I decided to rely on my flashes instead. From one to two sources, I favored the 2 lights setup. One was for the upper body and the other one was for the overall scene or to fill the shadows. For the Bathtub images, the approach was different. I tried to place one light as high as possible outside the room as a backlight. To avoid its presence in the frame it was on the side. The light bounced on the walls which helped in this case. I still added another light behind me bouning off another wall, just to slightly raise the ambient light in the room 1st image: Nansy (Toulouse - France) Fujifilm GFX100II + GF 20-35 mm F/4 R WR 1/160sec f/4 ISO 400 at 20mm 2nd image: Danira (Toulouse - France) Fujifilm GFX100II + GF 55mm f/1.7 R WR 1/125sec f/1.7 ISO 80 3rd image: Nansy (Toulouse - France) Fujifilm GFX100II + GF 55mm f/1.7 R WR 1/160sec f/1.7 ISO 80 Nyamgepel : (Toulouse - France) Fujifilm GFX100II + GF 20-35 mm F/4 R WR 1/160sec f/1.7 ISO 400 The apartment is not that big and the rooms are rather small. But, I am used to working in small spaces, so I was able to find solutions for our portraits. You can now watch or rewatch the video and carefully analyze the light placements, the position of the models, and of course the shadows on the resulting images. All the individual sessions will be posted here on the blog next week, this means the complete gallery and behind-the-scenes videos. How did I retouch those images? I am glad you asked, just simply click here: Photoshop's best companion. Danira (Toulouse - France) Fujifilm GFX100II + GF110mmF2 R LM WR 1/160sec f/2 ISO 80
- The MUSEUM (Short dance film)
Main and all alternative cuts This is the original, what I first imagined when this project was greenlit. I wanted a minimum of 3 performers (4 max), different personalities, styles, and a beautiful setting. The Augustins Museum is one of my favorites in Toulouse. It has been closed to the public on and off for some time now due to renovations, and I always thought creating something there while in that state could lead to something interesting. The Museum (Original ensemble cut) It finally happened. The final cut of the ensemble cut as I call it was the original idea. The other 3 versions which concentrate on each dancer's solo, were only possible because of the way I planned and shot the entire project. There are 2 versions of the song, a short and a long version. The long version was used for the ensemble cut. The short version was sent to the performers and was used as the base for their original choreography. This is why the short version of the song was used for the alternative versions of the short. The Museum (Nansy's Solo) Our photoshoot together: Nansy's portrait session The Museum (Nyamgerel's solo) Our photoshoot together: Nyamgerel's portrait session The Museum (Danira's solo) Our photoshoot together: Danira's portrait session I have a few short behind-the-scenes clips that are waiting on my hard drive, ready to be edited. I will share a few more words on this incredible short but intense journey with these amazing artists next week, on the day of the YouTube post. Feel free to share these all around... I am already working on my next short... Hang tight! THE MUSEUM A short film crafted by @hazekware 1st AC MArlène Blackdough Choreography and performances: @nyamgepel @nansydamianova @daniracrobat Nyamgerel Gankhuyag I Nansy Damianova I Danira Quintanar Music: "The Calling" by Outland Filmed on @fujifilmfrance #GFX100II Light provided by @godox_global Edited @aqcolor_benq monitors Entirely filmed inside the @museeaugustins Museum in Toulouse Huge thanks to the staff & crew at the museum! Business inquiries: hello@hkvisuals.com
- A closer look - For rent
A short dance film feat. Angelina Rakova This article is an update of a previous post. I added 2 videos to further show how these videos are made. The approach is different each time, but I sometimes come back to this method that I've used a couple of times now over the years. But before we dive a little further, just a few words on how this one came to be. It became a habit... I find an apartment, make a couple of photoshoots, and then challenge myself to write a quick script or synopsis and do my best to make it happen. It's part of my training, and I am not even joking. I get access to these locations and tell myself that it might not happen again, so let's make the most out of it. So here is the unaltered synopsis I initially wrote and sent to Angelina: Synopsis "A woman, haunted by the tragedy that binds her to a Haussmannian apartment, unfurls a long, transparent fabric and dances with it. Her movements, infused with deep emotion, convey her tragic tale, and the fabric symbolizes her emotional burden. As she collapses and disappears, a couple enters the apartment, unaware of her ghostly presence. Later, a real estate agent discovers the fabric on the ground and wonders where it came from, a poignant reminder of the woman's tragic story." You'll quickly notice we changed a few stuff. I couldn't get a couple available for my ending so I had to ask one of the models to fill in and shoot the ending on a different day. Angelina did an incredible job, as a big chunk of her choreography was changed on the spot because we couldn't rehearse on location before principal photography. I even asked to change a few things because I had specific shots in my head I wanted to include in the final film. So here it is, "For rent", filmed on the Fujifilm XH2s and native Fujinon glass. - For RENT - Dancer & Choreographer: Angelina Rakova A film crafted by HazeKware 1st AC Marlène Blackdough Filmed with the Fujifilm XH2s Real-estate agent: Marlène C. Visitor: Nina Portalier Filmed in Toulouse Music: - Lashed Over A Hundred Times - Music by Sebastian Kauderer a HK VISUALS short film Angelina did a fantastic job that day. We couldn't rehearse, she discovered the location on the day, and with the ideas I had on the day she had to rewrite a big chunk of her choreography. "Rewrite" is the right word. I wanted to film different angles of the same choreography in two different rooms (initially 3). I wanted the viewers to feel disoriented, not knowing exactly her position inside the apartment. I still gave her 45 minutes before we started rolling, and gave her a few indications and the type of shots that were essential to make it work. The piece is short which is an advantage, she also doesn't start dancing right away. This was our only chance to make it work in a few hours. Once everything was set, I decided to apply the same method we used for my tryptic: "Will you be there" From three to two rooms, we agreed to film the entire choreo (without the intro) from beginning to end for all the main angles I wanted to cover. A mix of tripod shots and handheld camera work. I decided to share with you a quick edit of Angelina's performance in both rooms. The edit and color grading weren't baked and served as a base for the final video. but these 2 edits that were made before the final one, helped me choose the right sequences, and sped up my process of deciding when to bounce from one room to another. Here is the first room and main performance: Here is the 2nd room: These é videos were never meant to see the light of day, unlike the "I will be there" 3 videos, that showed 3 different perspectives. I learned so much during the process of this one, and hope this experience will help me on future bigger projects. If you have any questions about my process, I will be glad to answer them. I will catch you guys in my next project!
- Danira Quintanar Portrait session
Complete Behind the scenes I won't share the story twice, so head to the first session we made inside this apartment here: Nansy Damianova portrait session ! Did we apply the same recipe here? Almost! I worked with Nansy and Danira at the same time, so needless to say to save some time I used the same setups for both for almost the entire session. But you would have guessed this by yourself:
- Nansy Damianova Portrait session
Complete Behind the scenes I promised the entire Behind-the-scenes video of each session, so here is the first one featuring Nansy Damianova, an Ex-Gymnast now dancer and performer at the Cirque du Soleil. The company was in town for the show OVO, and this time I had the pleasure of seeing the act from backstage. We first discovered the show in 2018 thanks to Alanna Baker who was performing for the Cirque du Soleil. She was kind enough to put me in touch with some of the dancers currently with the company. One thing led to another, and we ended up creating some images for 3 incredible artists. The plan was simple, a simple portrait session in a nice apartment in Toulouse and a short video (more about that shortly) filmed inside the Musée des Augustins here in Toulouse.