


The tool I never thought I needed
- Haze Kware
- Jul 5, 2021
- 3 min read

Updated: Mar 11, 2022
PIXAPRO Optical snoot
This is currently the accessory I had the most fun with in the past weeks. You probably have noticed it in my Instagram stories I’ve been working mostly on portrait sessions these days. I am not quitting dance photography, I still photograph performers but with the COVID situation last year I wanted to develop my skills in work I don’t do often. I usually shoot on location, use the environment, and work with strobes. So to shake things up I decided to use continuous lights, sometimes mixed with strobes, I added backdrops in my work and played with colors from time to time... But the one thing I enjoyed the most was shaping my light in a way I never considered before... Using an Optical snoot!
I have only scratched the surface but I had the tool in my hands for enough time to already share my experience with it. Plus you will most certainly see it in future BTS videos so stay tuned for that on YouTube and Instagram. There is an entire series of videos on portraits done in small spaces that are coming where I will share with you the gear I use from near-zero budget to more expensive setups applicable at home or wherever your client needs you.
But more on that later, what’s the deal with this?
To put it simply you attach this device to a strobe, this one is a Bowens mount but I have the adapter to mount it on a broncolor flash too. Recently I've used it with the GODOX AD600pro. You need a bit of power for it to be effective, at least 600ws is recommended on their website. On the other end of this device, you attach a lens. I chose to go for an EF lens mount and attached a 50mm f1.4 lens because it works great for the space I have. Lenses with wide apertures are also recommended as they let more light out.
Basically, the lens lets you focus your light and this will give sharper edges to your shapes or it will make them blurry. This is something I tried to do in the past with continuous light and its fresnel and barn doors but it's easier to create shapes with this snoot. You can also use flags, but you will most certainly need a lot more space to get similar results.
So how does this work? It's easy You use gobos that actually give the shape to your light. You insert them in the Gobo holder and slide the whole thing in the snoot, you really don't need to read the manual, you will quickly find where to insert this. In the videos, you can actually see how some of the shapes look like against one of my backdrops.
Now think about it, think about all the creative things you can do, and how you can take your portraits a little further.
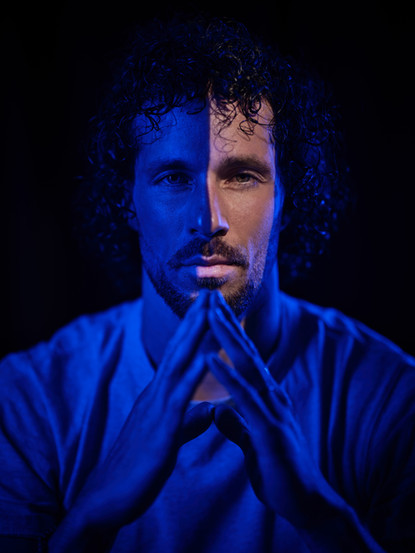
SWA (Toulouse - France)
Fujifilm GFX100s - GF 80mm F1.7 R WR 1/100sec f/1.7 ISO 50


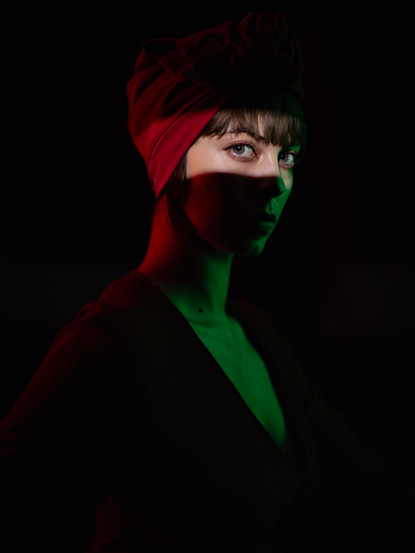
Louise (Toulouse - France)
Fujifilm GFX100s - GF 80mm F1.7 R WR 1/400sec f/1.7 ISO 50


Clara (Toulouse - France)
Fujifilm GFX100s - GF 80mm F1.7 R WR 1/100sec f/1.7 ISO 160


It is very well built and super easy to use. I said earlier I have only scratched the surface, I haven’t tested all the shapes and forms yet… but I can already say I love it. Be ready to see more images made with the PIXAPRO Optical snoot it in my feed, the next step for me has the world slowly opens up again, is to take it on location with me.
What cool and neat tricks do you use to spice up your portraits? Do you use optical snoots? Tell us in the comments below!


Comments