Search Results
394 results found with an empty search
- BTS Portrait photoshoot (Extended)
Feat. Paolina Last but not least, this is Paolina's extended Behind-the-scenes video. You might be here because the Youtube version didn't suffice, or just because you are a Premium member. This was the longest session we made inside this Haussmannian apartment. What was supposed to be a simple portrait session became a little more than that, because of her beautiful costumes. She had to bring them with her once again, and once I saw them I just couldn't resist.
- Still building...
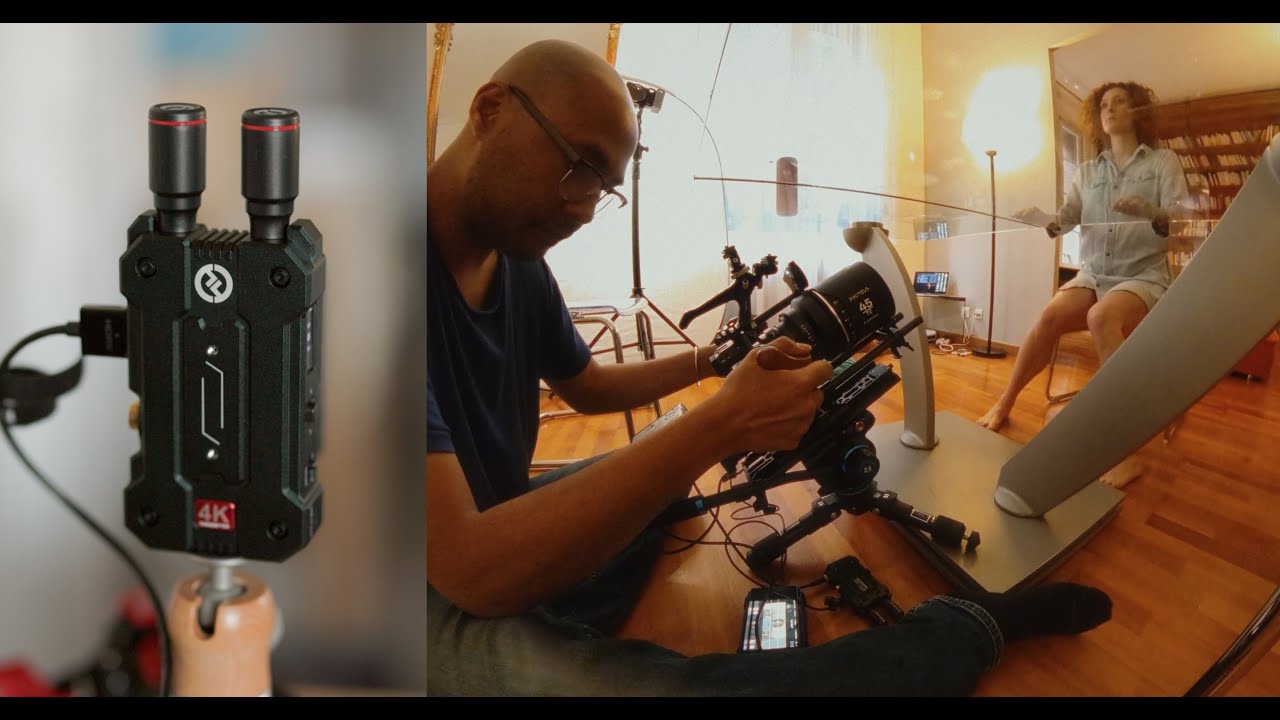
My XH2s Video rig! I made a video about my favorite accessories for the Fujifilm XH2s a few months ago. Accessories that make the experience of shooting videos with this camera, much more comfortable and enjoyable. A better user experience can help you create for longer periods of time and ease the creative process. I was missing a few pieces to make it complete, or almost complete. Let’s take a look at them. So how did I get there… 1st I needed a better grip on the cam and needed multiple attaching points for diverse accessories. And that’s why I needed a cage and the handles. I now have 2 of them that I can put on both sides. I can attach a mic easily on top, or a monitor on the top handle, it will all depend on the type of shots I need. If I need more accessories though there is a point where the cage might not be enough. This is where the Tilta lightweight shoulder rig comes in. Easy to assemble, light and compact, and delivered with a nice case. It is perfect, for any light camera setup. You can adjust the length of the arms and the angles. The entire rig can sit still on your shoulder. And all the mounting holes allow you to screw almost all the additional accessories you want. If I know I am going to film for longer periods of time, I will need a bigger battery, that will power, my monitor, my camera, and my video transmitter if needed. To power all this I have the Tilta V-mount battery plate. USB-c, DC out, D-tap, and of course V-mount batteries. I currently use the Bebob V98 micro, because of how compact and reliable they are on set. This gives me options. I can currently shoot with a tiny little setup handheld or have more power and stability on the shoulder with the entire rig. Now I just have to find a different way of managing my cables. Just to make this setup as clean as possible. So Tilta delivers once again simple and affordable tools. Both the Shoulder rig and V-mount plate are really well built. Am I done? Maybe not, but if this rig evolves I will let you know. My Tilta XH2s rig: Camera Cage for Fujifilm X-H2S Basic Kit Tiltaing Advanced Side Wooden Handle Type VIII (Left & RIght) Tilta Lightweight Shoulder Rig Tiltaing Smart V Mount Battery Plate 500G Counterweight
- BTS portrait photoshoot (Extended)
Feat. Mariella Lopez It's in the title, this is the extended version of Mariella's Behind-the-scenes video. I will only share parts of it in the Youtube version. It will also be mixed with images and footage from 3 different sessions made inside that apartment. There were 5 photoshoots made there, the other 2 sessions can already be found on the blog. And The galleries and Complete BTS videos can only be found here.
- 1st thoughts on the BenQ SW272U
BenQ's new 27" photographer monitor Today, I'm thrilled to introduce you to the BenQ SW272U Photographer Monitor! Yes, one more to my collection, I’ve had several BenQ monitors, and it’s fun to see how they’ve improved their monitors through the years, especially with this new member of the SW series. These are the main features at a GLANCE: The BenQ SW272U at a glance: - 27" IPS panel - 4K resolution (3840 x 2160) - Colour gamut: 100% sRGB, 99% Adobe RGB and 99% DCI-P3 - Accuracy and fidelity: 16-bit 3D LUT, Delta E ≤ 1.5 - CaIMAN and Pantone certifications - Advanced calibration software Palette - HDR support: HDR10 / HLG - Connectors: 2x HDMI 2.0 + DisplayPort 1.4 + USB-C (DisplayPort, Power Delivery 90W, Data) and more... In terms of color gamut, it offers 99% coverage of Adobe RGB, DCI-P3, and Display P3. Additionally, the PhotoVue SW272U and SW272Q are Pantone Validated as well as Pantone SkinTone and Calman Validated. Right now if I had to choose a 27” 4K monitor it would be the SW272U. This monitor's wide color space coverage brings out the best in my work, making it look exactly as I envision it and delivering accurate colors to my creations each time. With GamutDuo, I can compare the same image in two color gamuts side-by-side, giving me total control over my photo edits. Let's talk about the magic of the Fine-Coated Panel. They minimized, even more, the glares and reflections compared to the sw271c. Now I can focus on my art without distractions. Consistency matters and BenQ Uniformity Technology ensures I get consistent color accuracy and brightness across the entire panel. Fine-tuning colors has never been easier with Palette Master Ultimate software. Just three simple steps, and I achieve the optimal color consistency. They made it easier to understand, and it calibrates your monitor faster than ever before! A quick tip for my fellow Mac users – disable the "True Tone" color function for the best calibration results! You only need one cable with your MacBook Pro... and it even powers it! One feature, I was hoping for… No more tangled cables with the Hotkey Puck G3! It is now wireless… with the new handle at the back of the screen, I might even make the switch and finally bring this one on location instead of the previous version inside the BenQ SX-1. When you purchase this Monitor, you get Pantone Connect Premium for a whole year. I cannot dive into this, I will not use this app personally but I had to mention it. I really encourage you to check out BenQ’s website, as so many new features make this monitor a no-brainer for many creators, photographers, and filmmakers out there. Mine even has my name on it, sweet, I’ve been playing it for a while now, so if you have any questions, please feel free to ask, and I will try my best to answer… I might even hook you up on a little discount… So, my friends, if you were looking for a brand new 4k monitor to elevate the quality of your work, this one might be it… by the way, there is the BenQ SW272Q the 2K version of this monitor that is more budget-friendly… Get yours: https://shorturl.at/kyKWZ I hope you are having a great summer. I will take a short break in mid-August but will return with cool stuff in September. But, don’t go away yet, I will still share 1 or 2 videos before I leave. I will catch you in the next one, take care, and please, have a good one!
- Go Wireless, go Hollyland MARS 4K
My thoughts on the MARS 4K Video Transmitter I went wireless because of Hollyland. First with the Mars 400s pro , for video, and now with the Mars 4K. So what does it have to offer? Is it worth moving up from the Mars 400s? I know the Mars 4K has been around for some time now, and I still use it regularly. Let's put some of the techy stuff out of the way now! Hollyland Mars 4K at a Glance: 4K UHD 150m Line of sight range 0.06s low latency (at 1080p 60fps) SDI and HDMI support Smart Channel Scan and Selection interference-free transmission color LCD with a user-friendly UI wide range of DC power options–6V to 16V, NP-F batteries, and USB Type-C chargers. I wasn’t a fan of the overall look of the Mars 400s Pro. Loved the performance and the build quality but yeah there is something about the look and shape. The obvious upgrade with the Mars 4K is the added range, the improved latency, and of course, the ability to send 4K UHD at 30fps. We obviously tested this video transmitter for focus. They claim an ultra-low latency of 0.06s. Ideally you want it to be closer to zero, but at this price point this is the best you canope for these days. It performed well, if you don't work at T1.5 all the time you should be fine. Using the App, you can have multiple people enjoying the feed. The director, 1st AC, and your client, can have a sneak peek at what’s going on. I hosted a few workshops a while ago where I wished I had this tool with me. I was limited by the length of our cables, and I didn’t want to send a 1080p live feed on a 4k monitor. BenQ workshop Now, I cannot wait to give another workshop. I’ve done a few tests at home and it works great. I can definitely see myself using this for workshops and also during photoshoots. I also wanted to test the range a little bit further. I had so many bad surprises in the past with gear that ended up not being up to speed or that failed me with only a few obstacles in the way. I went from my living room on the first floor and walked to my backyard, and never lost the signal along the way. It is now always in my bag, like many other Hollyland tools that I’ve been using for years now. Wireless communication with the C1, wireless audio with the Lark 150 (by the way a new updated version came out for both recently), and of course wireless video. These are very well made, I am sure I will be using them often in the months to come. I haven’t considered an upgrade for some of these, because why change if it works well for the things I am currently creating? Unlike the 400s Pro, I love the look of the 4K, how robust it feels, and the multiple powering options that it offers. The only thing I may want in the future… is near-zero latency, at a similar package and price point. But maybe I am asking too much? You should seriously consider going wireless too, and if you are at the moment, check out their website and look at all the amazing tools they offer for filmmakers. www.hollyland.com
- Behind the scenes Boudoir & Portrait
Featuring Charlotte Ruet We had this apartment for a couple of days initially for a short dance film. But I had some spare time so I decided to squeeze in a few portrait sessions there too. This is one of them, with a very familiar face, at least for the premium members of this blog. Let’s not waste any more time, let's dive into this. Her name is Charlotte, and we met a couple of times already in the past for studio-like sessions. We played with RGB tubes, continuous lights, and flashes… to a point where I am always confident knowing I will be working with her. Portrait & Boudoir Home session Home studio boudoir with RGB led lights Behind-the-scenes portrait photoshoot Charlotte R. (Toulouse - France) Fujifilm GFX100s + GF 80 mm f/1,7 R WR 1/160sec f/1.7 ISO 640 This apartment is huge… but empty. To make it short and easy we worked in only one room. With the other upcoming BTS, you will see how I managed to make each session different and unique. We started the session with simple portraits using the light coming from the windows. No reflector, no flash, just the window and the curtain to control the light. Charlotte R. (Toulouse - France) Fujifilm GFX100s + GF 80 mm f/1,7 R WR 1/160sec f/1.7 ISO 500 The Fujifilm GFX100s, which might soon retire from this type of session was used throughout this session. Paired with the Fujifilm GF 80 mm f/1.7 R WR you have my go-to portrait combo, and these two were all I needed for this photoshoot. Charlotte R. (Toulouse - France) Fujifilm GFX100s + GF 80 mm f/1,7 R WR 1/125sec f/1.7 ISO 1600 You will see the BENQ SX-1 in action here, not for all my images, but it was one of the first times I took it out for a spin. It’s that black case, where I can attach my SW271c screen on the lid! You cannot miss it... I also used for the first time that weekend the Area 51 tether cables, which replaced my orange Tethered Tools cables. They are red, and long, and have so far performed pretty well, but more about these soon… I needed more control over my light as the session progressed, so I used a P-90 and Godox AD1200pro for the following images. Charlotte R. (Toulouse - France) Fujifilm GFX100s + GF 80 mm f/1,7 R WR 1/160sec f/1.7 ISO 200 I only have one regret, and this will probably have an impact on Future sessions of this type. I can now confirm I hate working with white walls. They are dull and reflect too much light. It kind of worked for our dance short film, but for our portraits, I am a bit skeptical. Charlotte R. (Toulouse - France) Fujifilm GFX100s + GF 80 mm f/1,7 R WR 1/125sec f/1.7 ISO 200 One the two following images was lit with window light. Can you guess which one? We ended up choosing the one that was shot with a flash... but still Both are valid in my eyes. Charlotte R. (Toulouse - France) Fujifilm GFX100s + GF 80 mm f/1,7 R WR 1/125sec f/1.7 ISO 200 and... Charlotte R. (Toulouse - France) Fujifilm GFX100s + GF 80 mm f/1,7 R WR 1/125sec f/1.7 ISO 2000 An exclusive BTS session made in this apartment is in the making and should be out this Friday, only for the blog, and only for premium members. Something a bit different… look out for that. The other sessions should come in a week or so... stay tuned.
- BTS Portrait photoshoot (Extended)
Feat. Nina Portalier 4 out of 5, this is Nina's extended Behind-the-scenes video. I said it in my previous posts, I will only share parts of this in the Youtube version. This is the shortest session I made in this Haussmannian apartment situated in the center of Toulouse. It was my first time working with Nina aspiring French actress, and I hope to be able to meet up with her again this summer for future Film productions. We did improvise a bit, nothing was really prepared before the session.
- EVOTO Ai is this the future?
Using Ai to retouch my photos. This one will be a bit different, It’s been a while since I've talked about the retouching part of my work. I have to be honest, it is not what I like most about photography. I love the preparation phase, being in the field creating my images, and the final color grading process. The retouching part, I do not like it so much. With Ai being everywhere right now, I thought it would be interesting to see what it can do for us. Can it help us speed up the process? How good are the results? Let's talk about EVOTO Ai the Ai powered photo editor software. So how do I usually do things? Keep in mind that everything I am going to share with you here is through my perspective, and how I might use this software in my workflow. So typically, I would open my photo in Capture One and prepare my file for Photoshop if needed. Basic adjustments, and corrections, and if my model shows a bit of skin, I will use the skin tone tool in Capture One to unify the skin hues, saturation, and lightness. Once this is done, I create a TIFF file and open it in Photoshop. I almost always use the skin tool in Capture One. This is where some of you might send the file to a retoucher. I always do my retouching myself. Now potentially with EVOTO Ai, I have a third option. In Photoshop if I want realistic results without touching the original texture of my model’s skin, I would use the dodging and burning technique. It takes some practice, it’s long, so if you are not into beauty retouching or not working for the beauty industry, just forget about this. Then there is the frequency separation method. Faster, and easier, but still can take some time depending on what you are working on, but this method really is enough especially if your work ends up online and in small prints. So my question was, does this software allow me to skip all of this? No need to choose either method anymore. Can I do my retouching faster than before? Let’s open the software and find out! Once you have created a session, you import your images, and this is what you have. The overall experience is pleasant, you easily understand and navigate through the menus. On the top left are some presets, if you are lazy, you can directly use them, with one click you might find something that works for you. I feel they are a bit too much for me, so decided to go on the right and play with the different sliders. Everything is well organized and intuitive. I would use almost the same exact order to retouch my images in Photoshop with multiple different layers. With a simple slider, you modify specific parts of the image, specific parts of the body, and common problems you might encounter during your retouching process. With simple sliders, you will see your image change in real-time. Remove, blemishes, freckles, and acne. Remove face moles, body blemishes, and birthmarks in seconds. You can even reduce the wrinkles from the forehead, neck, and eyes, reduce the smile line, and double chin. And one of my favorite sliders is the Dark Circle reducer for your tired models. The next part is a bit more tricky. This is where you can lose the realism of your image. Now keep in mind that for the purpose of this test, I might slightly go overboard so that you can actually see the changes. On the right Panel, you can see you have different sliders that target different parts of the face. I have never used the rosy complexion slider so far, on the other hand, the Unify Body complexion is really useful. It helps balance everything out on the body. I wish there was another slider to correct any excessive redness. Another cool tool is the skin color slider. I chose what seems to be the closest to my model’s skin and then dial it down to where it looks right. You can also add virtual makeup to your model's face. I know some do this, if this is your thing, EVOTO Ai can help you do it faster. Some presets already available are more convincing than others. Of course, you can dial down the effect if you want something subtle. Once you have done all this, you get to the part that is not really for me. I never change the shape of a body or a face, but I am a bit curious so I played with it a little bit. It’s really crazy how you can reduce the size of the head. The width, the height, and the overall shape. It seems to detect pretty easily the different parts of the face. The same thing applies to the Body, I know some influencers that should buy this! Here are some before and after side by side (No color grade): The dark eye slider was really effective here (No color grade)! Smooth skin, and more balanced and even tones in a few clicks (No color grade). From there You have 2 options, you can color grade directly in the software and finish your image there. Or you can send it to Photoshop and do your color work, or modify anything else you need. You can use EVOTO Ai from start to finish! I’ve been using this for only a week, so keep that in mind, I will have to do a follow-up to this video in a few weeks, and we’ll see if my feelings about all these change. So far I am impressed, I really am. You can make things look natural, and really dial what feels right for you with just a few sliders. Beware, you can easily push things too far, so you will have to make a few attempts before getting used to the system... don't worry, you will get comfortable with the software fast! Down below are the final edited images. Would I use this in my work? My answer could have been Yes, a few years ago, especially during COVID. I was doing a lot of portrait work during that time, that needed retouching. And because of the amount of images I had to work on, this software would have been great. One thing I haven’t mentioned yet is that you can batch-process your images, sync the changes and apply your changes from one image to another. You can even make your own presets. So many options, helping you save precious time and accelerate your post-processing work. I did retouch all my images from my latest lingerie session with the software , and the majority of the images from the sessions made in this apartment were retouched with the software too, so look out for that. The only way to know if this software is for you is to actually test it. So follow the links down below, and get 30 credits to test it for yourself! EVOTO Ai: Free 30 credits My only complaint so far is that I don’t really understand the reasoning behind their pricing. You pay 83.88$ for 1.2k credits… 1 credit = 1 photo when you export it. This is 0.0699$ per photo which, when you think about it is not much... Which is great! But the thing is, in a year, because of the type of work that I currently do, I will not use 1.2K credits. It would probably take me 2 years to use them. I don’t like being tied to a software. With all these plans, and subscriptions that we already pay, I would have preferred something that gave me more freedom, the possibility to only buy 300 or 600 credits at once. Basically, this might only be relevant for photographers that retouch a high volume of images. I cannot speak for high-end retouchers out there, but should they be worried? Would you use such software for your work? What do you think? Tell us in the comments below! I will be playing some more with this. Let's hope I can make a follow-up video in a few weeks.
- For better or for worse...
Changing my methods, was it a good idea? One of the many reasons I still keep up with the blog. It’s to share this type of session. I decided to completely change my approach for a big part of this photoshoot. I even did the opposite of what I usually do. For the fun, challenge, lesson, and everything that might happen before, during, and after. A few weeks later I finally took the time to review the files, Choose the ones we liked with Clara, and retouch a few for the blog. I rarely do this, but I had some spare time in that apartment. We filmed a short dance film that I am still working on, and we were so efficient that I was able to squeeze in 5 different portrait sessions. The one with Charlie was posted a few days ago, so this is the 2nd one made in that big apartment. I now invite you to watch the following behind the scenes, and I will then share with you some thoughts... once you have finished watching.
- BTS Contortion and colored smoke
Lost & Found session with Maeva K. This photo shoot is from February 28, 2021! I don't know why, but the making-of footage got lost... and I found it again a little while ago while cleaning up my hard drives. You've probably already seen some of these images, as I shared them on Instagram 2 years ago. It felt weird to dive back into that session. If you've been following me for a while, you'll definitely notice the detail that proves this shoot is a bit dated... My Broncolor flash!
- Behind the scenes portrait photoshot
Dance portraits Feat. Angelina Rakova A portrait session at the showroom Toulouse where we got to use some of their prototype dresses, a wonderful ballerina that you probably have already seen with me in the past. These are some of the ingredients for this session… Of course, if you wish to know more about all this, the video and gallery are down below! I’ve been there before, but haven’t posted any footage on YouTube. If you are a premium member, you will probably recognize this place. It will close down soon, if not already, so I will probably not work there anymore. Behind-the-scenes ballerina photoshoot Feat. Isabelle Ménard This time I brought a flash with me... that behaved strangely. The Godox AD300 pro changed its settings mid-shoot and sometimes fired all by itself. This never happened to me before so I have to investigate this further. Have you ever had this issue before? With Godox flashes in general? Please share your experience in the comments below, I really want to know. Other than that, the session went smoothly. This is what happens when you already know the model and are familiar with the space. Unfortunately, we were not there at the best time of the day, this is why the flash was a nice option to have. Like the last time I wanted to take advantage of these big windows and sometimes it just wasn't possible. I primarily worked with the GF 50mm f/3.5 R LM WR and GF 80 mm f/1,7 R WR lenses with the Fujifilm GFX 100s. We stayed in the main room for this one and played as much as possible with the environment. Angelina Rakova (Toulouse - France) Fujifilm GFX100s + GF 80 mm f/1,7 R WR 1/160sec f/1.7 ISO 100 Basic intention, feel, and composition were given each time to the dancer. I was not looking for a performance, just simple portraits. I know Angelina can improvise a bit so I gave her a bit of room to express herself. The following images were actually done without the flash. After a few shots, I preferred the mood without it. Angelina Rakova (Toulouse - France) Fujifilm GFX100s + GF 80 mm f/1,7 R WR 1/160sec f/1.7 ISO 100 And this is where it got tricky. There was suddenly not enough light reaching her from the windows, because she was in between and not directly in front of one, and probably a few clouds got in the way. So I placed my flash behind her above her head, facing the white wall and mirror in front of her. This was enough to compensate for the abrupt change. Angelina Rakova (Toulouse - France) Fujifilm GFX100s + GF 50mm f/3.5 R LM WR 1/160sec f/3.5 ISO 250 Did I mention these windows yet? I know I am obsessed with them, I've already made these shots before. Same place, different models, and different camera and focal lengths. The sun was hitting the window sideways. I said earlier that it wasn't the best time of the day to shoot there, but we managed to make it work. Angelina Rakova (Toulouse - France) Fujifilm GFX100s + GF 80 mm f/1,7 R WR 1/320sec f/1.7 ISO 50 With all these dresses around us, I just couldn't resist playing with them. A huge thanks to Céline to let us use some of these prototypes. She is also the person you see throwing the dress and doing Angelina's makeup! Angelina Rakova (Toulouse - France) Fujifilm GFX100s + GF 50mm f/3.5 R LM WR 1/200sec f/3.5 ISO 320 I usually post my images in chronological order, so these are really the last images we took. We just placed the dress on the floor, I only used one light placed camera left. Nothing fancy with the pose, I just asked Angelina to follow the main light source. Angelina Rakova (Toulouse - France) Fujifilm GFX100s + GF 50mm f/3.5 R LM WR 1/200sec f/3.5 ISO 320 What else can I say? Sometimes we don't need much. I hope I will be able to solve my flash problem soon, this is unacceptable, even from Godox! I will keep you updated on this. I also recently decided to switch to another camera for this type of work, but I will tell you more about this soon. Don't worry, it will not be that crappy clickbait post: "Why I switched from this to that brand", I just realized something about my current work, and I believe a change is necessary. A new short dance film, with its Behind the Scenes video, is on the way. I should stay home a bit in the coming weeks, so I will try to share more content in June. I will also organize a giveaway for all my French and European friends (Sorry!) in the coming weeks but only on Instagram … so please join me there and look out for that!
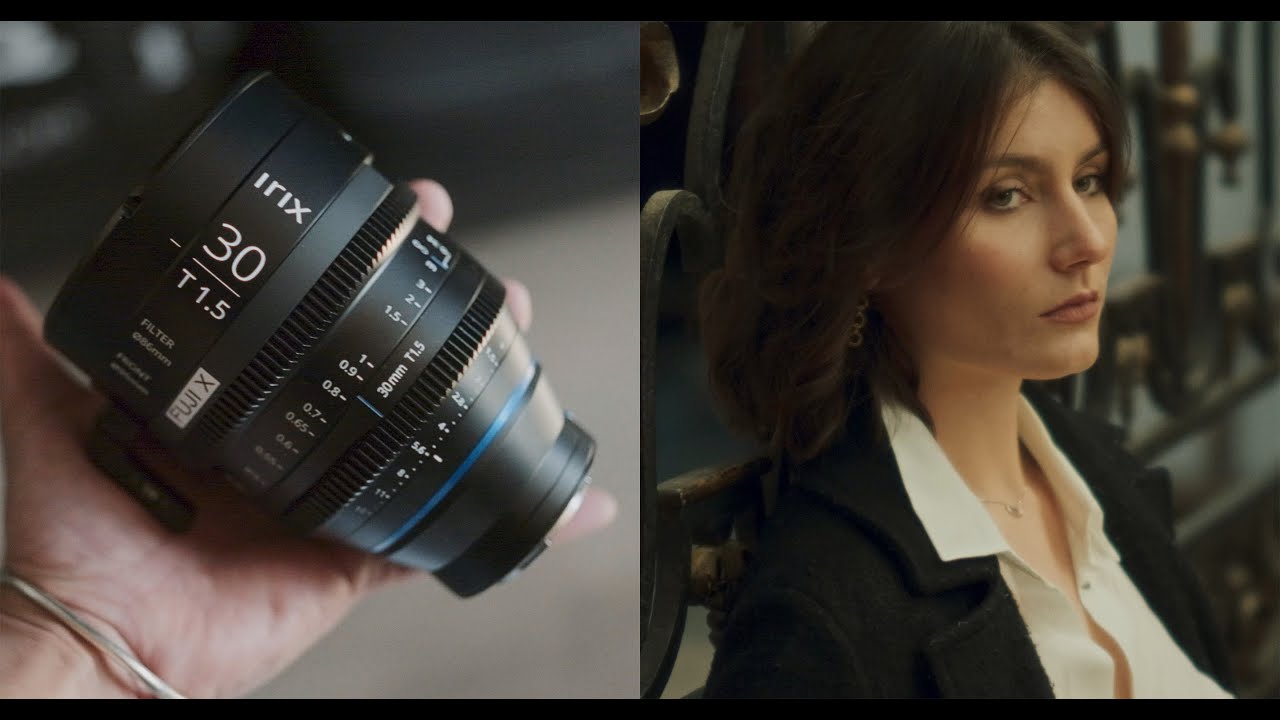
- IRIX cinema lenses for X-mount!
The best cinema lenses for your X-mount cameras? A few weeks later, They were back in my hands. I’ve tested them before but this time there is a tiny little difference with the previous sets I had… They are now available X-mount, making them a great companion for your Fujifilm X-mount cameras. I am not going to deliver a long speech here because, to be honest, I’ve already said what I had to say in my first video about these lenses. My Dance tango video was entirely shot with it, I was pleased with the look of these lenses, and for the price, there is really not much to complain about. The choice of lenses for a project is personal and tied to your judgment of what’s necessary to tell your story. And it’s great to have manufacturers now offering these cinema lenses that are specially built for video, for smoother, more precise focus pulls, and with a look that helps mitigate that digital sometimes oversharp look. I said in the intro that they are now available for the X-Mount, so if you are a Fujifilm video shooter and don’t want to bother using an adapter, these could be made for you. The great built quality hasn’t changed, the image I exactly how I remember it. I still believe they are a great entry to cinema lenses. I have yet to have a lens with no focus breathing, but here I feel it is very well-controlled and barely noticeable here. The short portrait video I filmed with my buddy Charline was made during the time I was testing the low-light capabilities of the XH2s. I shot everything Handheld in Prores RAW. This is where having lenses that offer a T1.5 max aperture can come in handy. It could also be the reason why you will seriously consider these lenses. The next clips I included in this review are from a project I am currently working on where I was able to use all three lenses, the 15mm, 21mm, and 30mm respectively. They still have the same form factor as each other so they are readily interchangeable and identical in operation, allowing you to change focal lengths in no time. They are now on my list for any commercial or narrative work I might do. They are rather small, and not too heavy so for any handheld, or gimbal work you should not struggle to balance them. The one thing that unfortunately hasn’t changed is the focus ring that I still find a bit stiff. It is balanced and allows you to pull focus smoothly, but if you are using a wireless focus system, it better be strong. Competition is tough these days, as there are more and more affordable lenses hitting the market right now. Anamorphic lenses are flooding the market, and personally, I won’t complain, more options to choose from, with various budgets, less excuses to not go out and create. In the market of affordable cinema lenses, these are in my top 5, worth considering. Have you got any suggestions? What are your favorite cinema lenses that sell for under 2K dollars? Under 1.5K? Tell us in the comments below. Just in case you wish to get your hands on these, please consider getting them via these affiliated links to support the blog: Learn more about IRIX The IRIX 15mm T1.5 21mm T1.5 30m T1.5 My first video review for these lenses