


Search Results
394 results found with an empty search
- The Sequence shot - Handball photoshoot
1 month without posting any videos... and I stopped counting on my blog! But I have an excuse... or sort of? My life has been a mess these days, my wife and I left Antibes in late January and we have been living between Le Havre, Strasbourg, and Toulouse since then My life has been a mess lately, I am desperately looking for a new apartment, cause yes we are settling down... I've been thinking a lot lately about the future content of my Youtube Channel and my blog. I will, of course, continue to share the behind-the-scenes of some of my photoshoots and some of my secrets as well. I will show you a little bit better how I make my images, the techniques I use, and maybe the way I retouch and color grade my photos. But if I want to share quality stuff, that is one of my main goals in 2018, you will have to be patient... Because it takes some time, to prepare, shoot and edit, I am not a full-time blogger and YouTuber. But back to this session, I've been experimenting with new things lately in my sports and dance photography and I need to experiment furthermore before telling you anything about my process. Sequence shots, adding new props, and testing new light setups, will be on the menu of my future videos. For this Handball session, I wanted to try a few sequence shots, but I didn't want to use the usual technique. Basically, you can make a sequence shot in one unique photo with a long exposure image by firing multiple flashes which will freeze the movement and create the sequence. The problem with that technique is that you cannot play with the opacity of the sequence in post. So I tried, the photoshop way by taking multiple shots and combining them in post Katarina Stosic Shot with the 5D mark III 1/200sec at f7,1 ISO320 - 38mm I wanted to add that surreal atmosphere with a bit of fog or smoke, but with the blending of several pictures, it would have been hard to make it work. So I decided to add smoke digitally... Shot with the 5D mark III 1/200sec at f6,3 ISO250 - 24mm I have used smoke in the past, fog machines, and smoke grenades, there are cons and pros of the different techniques. I will talk about all of them further down the road because I haven't yet mastered the techniques. Shot with the 5D mark III 1/200sec at f6,3 ISO320 - 24mm Huge thanks to the talented Katarina Stosic, a pro Handball player in Le Havre at the time of the shoot. There will be at least one blog post each week, so be sure to subscribe to the newsletter if you don't want to miss future posts. What have you been up to lately? Do you use props, smoke on your photoshoots? Are you a master at sequence shots?
- Test, fail, learn, repeat!
This may be a follow-up to my blog post about how you can learn new skills . No client this time, much more time to work than usual, exploring new ideas, using perspectives I am not used to, and on this particular session, mixing Ballet and Circus photography. This is really really important guys, at least it is for me. I am always learning and I try to find some time for myself and my photography to do things I don't have time to or cannot take the risk to do with regular clients. To sum it up, this session was all about, testing, allowing myself to fail, improving my skills, having fun, and why not creating awesome images. Canon France was kind enough to let me play with the 85mm L 1.2 and 35mm L 1.4 alongside the 5D Mark IV for 2 weeks, so most of the shots you will see were made with these fantastic tools. I also tried different light setups and even took a shot or 2 without my beloved Siros L. I am a bit obsessed with deep shadows at the moment, squeezing my model in between 2 lights creates an interesting mood and atmosphere. So, what about you? Are you still learning, are you still challenging yourself? Let me know what drives you these days and how you keep your game fresh and up to date. Huge thanks to Canon France and Broncolor once again. Thank you, Josephine and the Studio L'envolée for letting us create these images in such a beautiful and handy location.
- Inside the Villa Schutzenberger not another contortion photoshoot
Maybe some of you have noticed, I skipped last week's video.... but I have a good reason... I finally found an apartment! I am not a vlogger, so there was no point for me in sharing my week moving in and I would not be good at making something out of nothing. So here we are, freshly installed in Toulouse, waiting for the sun to show up, because, this is kind of the main reason we moved from the Northeast of France to the southwest... and my wife finding a job there... I am now ready to set up new and bigger, projects, I really hope I will be able to find the right people to fulfill my vision and all these crazy ideas I have in mind. Before I say anything about what may or may not happen here, let me finish sharing some of the test photoshoots I did in the past weeks. In my last video, you saw me play with a ballerina and circus performer somewhere in Strasbourg and during that same week, I had the pleasure to meet Emma, a French contortionist. Again we made this happen in a beautiful place, you know I am not a studio guy, and you know how much I love fancy places. Canon France was kind enough to give me a few tools to play with... The Almighty 5D Mark IV and the 85mm f1,2L mark II and the 35mm F1,4L Mark II lenses. These 2 are amazing performers too, I will tell you more about them in a future post. Of course, I had with me 2 Broncolor SirosL ... But you already knew that. 5D mark IV - 35mm F1,4L mark II 1/200 at f3,5 ISO 100 I will shortly share my opinion on the Mark IV and a few prime lenses I usually do not use in my work. Do you guys know how I love wide-angle lenses but are your favorite tools? What do you use to make your images? Let me know! I will be looking for volunteers to assist me on specific shoots. If you wish to learn more about how I work, this is the perfect opportunity. Join me on IG: @hkvisuals and check my stories from time to time. All these test photoshoots are done for a reason... But we'll get to this later!
- The 85mm f1.2L II & 35mm f1.4L II, the only Lenses you need?
Are the 85mm f1.2L mark II and the 35mm F1.4L mark II the only lenses you need? I own a 24 - 70 and 70 to 200mm f2.8 which can pretty much cover 80 to 90% of my work (roughly)... So why would I need these 2 primes? Basically, prime lenses perform better than zoom lenses even if some would disagree and say that the differences are not always noticeable.. at least by the untrained eye. I use the 24 - 70mm a lot and even made a video about it. But the biggest advantage primes have over zoom lenses is the ability to open wide and gather more light. The 85mm opens up to f1.2 and delivers a marvelous bokeh, and allows a lot of light to reach your sensor which is always in handy... More options are always cool of course if you have the money! So I took the 5D Mark IV with me, threw the 85mm for all my tight shots and portraits, and the 35mm for all the wides, and close-up action shots in my bag. If the video goes too fast for you, down below are the images, Infos, and the diagrams: For these last shots, no diagram was needed, I used Broncolor's edge mask on my 60 x 100 softbox. You can actually build your own by simply cutting the shape of your softbox out of a piece of black fabric or cardboard (that you will have to paint black)... It will have to be smaller than your softbox to let the light bleed/ come out from the edges... And I guess that's why they call it the edge mask. If you are bad at making stuff like me, and if you want something that will last through time, get the Broncolor one and voilà, with one light you can produce this effect. Depending on the amount of ambient light you are letting in, you can have just the silhouette or make your model slightly visible. For these images, I used the 85mm lens. So did I feel frustrated, not being able to zoom in and out? Was I tired of using my feet to get close to my subjects? The answer is No! With these two I was able to make all the shots I needed. Maybe without knowing it, I was already using these focal lengths with my zoom lenses in past... I will share more on these 2 soon, individually... But so far I am quite impressed with the results. My 85mm 1.4 was staying home these past months I might take it out more often after that and maybe test it against the f1.2. What about you folks, Do you use primes? and what are your favorites and why? Tell me in the comments below!
- How to easily make any location your studio!
Don't have a studio? What if I told you, you don't need one? In this video, I show you how to make any location your studio fast. I love, working on location, but you may sometimes have clients asking for headshots portraits that have a neutral or plain background. This isn't a problem and is actually easy to achieve. No backdrop is needed (or sort of), you can use only one light, and you can do this anywhere! For example these basketball portrait shots... we were indoors on a basketball court and I wanted to make a few portrait shots with just my subject and nothing recognizable in the background. I have talked about in the past, I love to underexpose my background ( How I create my dramatic pictures ). Here, you pretty much do the same but instead of underexposing, you just kill completely the ambient light and darken your background. Your light just has to be strong enough to correctly expose your main subject and Voilà you have your shot that could have been made in a studio (but it wasn't). Make sure you are not too close to a wall to avoid the reflection/ bounce of your light and you are good to go. But what if you are working in a small bedroom with obstacles, objects, windows, and walls everywhere? Close the curtains find the largest or create enough room to at least use a 50mm lens... and I am sure you can find anything that can basically cut the light and be used as a backdrop. Of course the darker the better, here, we used a black folding screen (paravent) during this home session with French model Melody Lunel. We could have used a dark blanket or curtain, I am sure you can think of something... Anyways it's going to be so dark in the back, that you will barely see any details. So there you are you don't have to bring tons of gear, I only had 2 flashes, 2 light stands a tripod, and my camera bag. And guess what, you can achieve this look with only one light. I mentioned it last week, what is that mysterious "Edge mask"? I've been using it a lot for my sports portraits lately, the Broncolor "EDGE MASK" is a cool tool that can help you make beautiful silhouettes, and moody, dark pictures. Huge thanks to Melody for her trust check out her IG for more! Feel free to share your lighting setups on location in the comments, tell me how you do it.
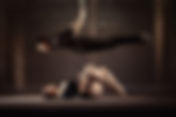
- How to photograph a circus artist… inside a gym!
There are so many things to say about London! Unfortunately, my stories are always the same... A few weeks back we were back in the UK and the weather was awful at best. It was my 4th time in London and I really admire all you fellow photographers that work there all year long. Finding an indoor location in London was a must during our stay and if you have ever tried to do so, you must know how difficult the mission is... It is, in my opinion, the worst city for authorizations to shoot anywhere, outside and inside. So really, I am happy that not one but 2 Gyms accepted to welcome us for our shoot. The first one is Core Collective, where we made these amazing shots : Unfortunately, our camera refused to work that day so we do not have any behind-the-scenes images from that session... but we got something from our second session that happened at Third Space Marylebone. You know I've worked in Gyms before, but with fitness and CrossFit athletes, which makes sense, but for this one, I had Miranda who (you may have noticed) is an aerialist and a contortionist! So how did we make it work? 1st let's start with the most difficult shot, with all these mirrors, I wanted to use a flash and I wanted to have multiple reflections. So, I went for a kind of symmetrically centered shot, with my flash placed camera right. My 5D Mark IV was placed on a tripod and once I had my composition right we had to choose and nail the pose. I wanted something low facing the camera... once we got the shot I asked everyone to leave the room to take multiple shots of the scene with the flash placed differently. Basically, I am making an empty background plate shot to help me erase everything in post. I also made a video on that particular subject! The 2nd picture was maybe the easiest, Miranda can do anything so we couldn't run out of options. I just asked her: " can you hang up there?" and she answered: "yes" right away! For security reasons, we used a crash pad, that my partner would pull in and out of the scene, for Miranda to get up and down from there and to make it easier for me in post. For this 3rd one, I wanted to use accessories available around. I deliberately focused more on her because they were people working out in the back and the scene was way too busy for my taste. With the Flash facing her, we avoided any unwanted reflection or bounce of light from the mirror. This fourth picture wasn't easy because of the mirrors... again... Like the first one, we had to find a way to hide me and to control the unique light source I had. Plus there were a lot of things going on around so I decided to underexpose my background a little bit more than usual to focus more on Miranda. Shadows were on my mind at that moment so we placed my light at 90 degrees angle on my left to create that dramatic look! For this final shot, we couldn't film because... Usually, fog is not healthy for your lens! We had to make these pictures fast, so we discussed pose and composition beforehand... Like you always should! Once we knew what we were doing, we got inside, took our pictures. No flash, with the 85mm opened at f1.8 (ISO 2000), we managed to get a few interesting images. So basically, here is how to make it work: Try to use different scenes, do not make all your pictures in one place. Pay attention to details, any distracting elements, your own reflection, and the reflection of your flash. If there are a lot of things going on in your shot, if it's too busy play with the light, viewers are attracted by highlights, make it dark around and highlight your model Think your shot beforehand and think of what you are going to do in the post. Do I need a clean plate shot with nobody in the scene? Can I somehow make it work without using photoshop later on? The less time you spend in photoshop the better, get it in-camera. Things you decide to keep in your frame are as important as the things you leave out. Sometimes just a few elements can make us understand where we are and a tight shot will be the best solution! Thank you, Canon for the 5D Mark IV, 85mm f1.2L mark II and 35mm f1.4L Mark II. Shoutouts to the Broncolor Family for the light. Huge thanks to Core Collective and Thirdspace for welcoming us and letting us work in their amazing gyms. Thank you, Miranda, you rock, thanks for trusting me. There is more London stuff coming up so Rendez-Vous in my next post!
- Do you need an 85mm lens?
Simple question, and I believe we've all been there before...The 85mm lens is mostly recommended for portraits, people praise it for portraiture, I do understand why, but you can actually use it for a ton of things. The first reason why people love it so much is the absence of distortion, warping and it's respect for your model's facial and body features. People look great with this lens, the 50mm is maybe closer to what we perceive, but the 85 is not too far away. I've talked about the precautions you have to take when using wide angle lenses in the past, if you take a look at it you might understand a little bit better what I mean. Dance photography, 5 reasons why you should go wide! The 2nd cool thing about it is the distance between you and your model. You are not too far, no too close, you are not getting in the way and you are far enough to still be able to communicate with your model. 5D Mark III - 85mm f1.8 1/160s at f3.5 ISO200 BTS: Do with what you have – BTS Karate Photoshoot Feat. Jessica Hugues 5D Mark III - 85mm f1.8 1/800s at f2.5 ISO50 BTS: How I handle Natural light – Ballerina BTS video photoshoot 5D Mark IV - 85mm f1.21 mark II 1/200s at f7.1 ISO125 The third thing is that It has its own personality. I simply love the look. I love wide angle lenses, but sometimes you don't want your background to be pushed that far away. You want it closer, you want a tighter shot and when I have a succession of vertical or horizontal lines, I almost always pull out my 85. It provides a look that is pleasing to me when I need to focus on my model. 5D Mark IV - 85mm f1.2 Mark II 1/250s at f5.6 ISO200 5D Mark IV - 85mm f1.2 mark II 1/200s at f7.1 ISO100 The fourth reason why you should own that lens is the shallow depth of field and the bokeh The 85 lets you fine-tune a little more the separation between your model and your background. Another great thing of being able to open beyond f2.8 is the option to shoot in low light conditions without pushing your ISO too high. 5D Mark III - 85mm f1.8 1/400s at f1.8 ISO160 BTS: Behind the scenes outdoor crossfit photoshoot 5D Mark IV - 85mm f1.2 mark II 1/125s at f1.4 ISO800 BTS: Prepare for the worst! Last but not least, it's a prime lens, even the cheapest models give amazing results, results that for me are noticeably better than most zoom lenses. I own the 1.8, I have worked with the 1.2 mark II on a lot of my recent shoots and both deliver amazing the results. Of course, if you have the money for the better-built weather sealed f1.2 go for it... if not the f1.8 will do the work! You may have noticed that almost all of my examples do not specifically fall into the portraiture department. I use it for sports, circus shots, dance, it's really a versatile lens. Like I said in my previous video on the duo 35 and 85 mm you can get a wide variety of shots and get the job done with only 2 lenses. The 85mm f1.2L II & 35mm f1.4L II, the only Lenses you need? I loved the 85the minute I got it, forgot about it for a year or so and began using it again a lot recently. Do you own an 85? Why? What is your favorite prime lens? Tell me in the comments below.
- Do your homework – 5 tips for posing dancers and performers!
So this is for me the basics if you want to make things work and get the most out of your photoshoot with dancers and performers in general... Do your homework, as suggested in the title, basically do a little research beforehand. If you can learn a little bit more about your model, their experience, what they are specialized in, how long they have been performing and the type of productions they have been into and so on, you will do a better job! Knowing his or her weaknesses and strengths helps a lot. You don't want to ask them things they cannot do, your job is to help them shine and be their best. On top of that, the other great thing is that you will save valuable time during your session. Whatever the dance style, go watch performances... From ballet to hip-hop, you have to know a minimum about what you are about to shoot. Knowing the history can also help, being able to recognize the different styles is mandatory! Go watch classical ballets and contemporary pieces it won't harm you and the worst that can happen is that you might have a good time. Learn to understand dancing in general, and get used to watching them move! You can go as far as learning the vocabulary, the names behind certain moves, steps, and poses, which will greatly help you to communicate with them. What leads to failure when shooting performers is bad or the lack of communication because we don't speak the same language. So here is a simple approach to help you succeed, something I rely on, kind of the basics when I shoot performers. 1/ the location! Is it busy or not? If you have loads of details in the background or around your subject keep it simple. A pose or move anyone can understand... not something too small, too compact, we have to know roughly where the limbs are and what is actually happening. I personally use wide-angle lenses a lot, and sometimes my background is as important as the model. Here in this picture of Anjara, I asked her to look up to compensate for the empty space above her head, of course, the red dress helps to catch the viewer's eye. 5d mark III / 24 - 70mm f2.8L Mark II 1/200s at f5.6 ISO100 - 24mm Anjara Ballesteros - Menton (France) If you have a simple plain, refined, clean, modern background, then you can go wild and choose to go for much more complex forms and shapes with your performer. 2/ Size in the frame Depending on how much of the background you will include in the shot and the size of your model in your photo, a particular pose may or may not work. We talked about complex poses, shapes, and forms before, well if your picture is essentially centered on your subject, if the subject takes more than 50 % of the image you can almost do whatever you want. People will right away be drawn by the performance and the background will not really matter. 5d mark III / 85mm f1.8 1/800s at f2.5 ISO100 - 85mm BONETICS - London If your subject is smaller in the frame, and if you are using the environment, lines, and/ or light to draw the attention towards your performer... Then again keep it simple... Really basic poses sometimes work the best! 5d mark III / 16 - 35mm f2.8L Mark II 1/200s at f8 ISO400 - 16mm Francesca Masutti - Strasbourg 5d mark III / 24 - 70mm f2.8L Mark II 1/1000s at f4 ISO800 - 20mm Robin Ohl - Strasbourg 3/ Direction of light Let's say you have your composition, you know how and at what angle you are going to take your shot, your model is placed but you don't know if she has to face you if she should turn right or left... Look at the shadows, look at how they fall on your subject's face and body. And then it's up to what you wish to create. In this picture of Valentina, the light was coming from my left, so I asked her to face and go towards the light! 5d mark III / 24 - 70mm f2.8L Mark II 1/320s at f4.5 ISO125 - 24mm Valentina Pierini - Rome How I handle Natural light – Ballerina BTS video photoshoot In the picture below I asked Isadora to do the same but Wanted that split lighting on her face so I asked her to slightly turn away from the light. 5d mark III / 24 - 70mm f2.8 Mark II 1/800s at f7.1 ISO200 - 61mm Isadora Valero Meza - Lisbon A little bonus tip, if you are shooting around noon and the sun is basically above your model's head, have them slightly raise their heads to avoid those dark eye sockets. 4/ Everything is in your scene When I started I had a Graphic approach, everything was visual... and maybe that's why this channel is called HK VISUALS... 5d mark III / 11 - 24mm f4L 1/1000s at f10 ISO500 - 18mm Lyria Van Moer - Cannes Shapes, lines and forms, anything surrounding my model can help. Use anything that can visually help the viewer look where you want. The background can actually inspire your performer... Take a picture of the empty scene with the right composition, show it to your model, and explain what you imagine her or him to do. In your own words, tell them if you wish to have them continuing a line, imitating a shape or form, or using a handrail or a wall to lean on and so on... 5d mark IV / 24 - 70mm f2.8 Mark II 1/80s at f2.8 ISO250 - 25mm Yvonne Smink - Toulouse (France) For example here the idea was to continue the obvious lines of the handrails... To increase tension I deliberately placed her off-center. 5d mark III / 50mm f1.4 1/200s at f2.5 ISO800 - 50mm Same here with Nicole! 5d mark III / 70 - 200mm f2.8 Mark II 1/200s at f4 ISO500 - 95mm How to improve your compositions to make better photos 5/ Cheat Yes, I said it... but let me explain: It doesn't harm to get a little inspiration from time to time. I do this less these days, but it used to help me a lot a few years back. Instead of losing your time trying to explain what pose, move, or jump you want your performer to do, create a collection of images, different galleries of moves, and poses on your phone. When you are struggling, and when you can't find words to describe what you mean, show a few examples to your performer. We do not all have a choreographer or artistic director on set so this really comes in handy. Of course, the idea is not to copy other people's work but to use it as a base and you are going to build upon that. Depending on your dancer's experience this should be enough, most of the ones I've worked with so far were sometimes hard to stop. To end this article ask yourself these simple questions: What is the goal? What kind of shoot is this? What story do you want to tell? By answering these questions and by going through all the different elements I shared with you, you will have a list of constraints. This will help you and your model in the process of making decisions. Having too much freedom sometimes can be overwhelming. You've got to set limits, write down a scenario, keywords of what you want people to feel and see in the images you are about to make. Do you want something sexy, do you want something epic, and show the strength of your performer, or maybe you don't want people to focus too much on the model and you want them to have a much more neutral expression and make it very simple poses. If you want to save some time as I said before do your homework. Visit your location before your shoot, make a list of shots with different composition options, try and imagine your performer and sketch the type of lines and forms you want to create or look at on the web and maybe find pictures of poses and moves that may come close to what you wish to do. Again if you know what you aiming half the job is already done. So, what about you? Do you have a few tips to share on posing performers? let me know in the comments below!
- Create EPIC dance photos with flying fabrics [part I]
I've been trying this for almost a year now... not regularly but when I had time and when some of my clients were up to. This video will be updated at the end of this year or next year when I will be much more experienced and familiar with the process. It all started with normal dresses, floating in the air, flying adding that movement inside a sometimes too static pose if that makes sense. So I started with existing dresses, a real dress, and then we started creating fake ones by just adding a piece of fabric that kind of matched the color of my model's outfit. We are not in a studio, we don't have the luxury of bringing with us a blower or huge fan to make the piece of fabric fly. So you will have to bring at least one person with you to throw that fabric in the air... and depending on the length, thickness, weight, and number of fabrics you are using you may have to gather an entire team. I used only cotton-based fabrics and when people ask me what kind, I have no definitive answer as for today. It depends on the effect you want to get, and where you are going to make your shot. Whether it is outside or indoors... because yes the wind will play an important role. For example, here we were inside and preferred a light fabric that gave me enough momentum when thrown in the air to make interesting shapes. We even used curtains for a couple of shots and it kinda worked... so basically you can almost use anything. A Rhythmic Gymnastics photoshoot inside EilenRoc And then I wanted to go a little bit further and decided to play with bigger, longer fabrics. Using aerial silks that were up to 12 meters long but the issue was the weight and the: "how are we going to make these fly". We tested, tried, and failed multiple times before getting something that worked for me. It's not perfect, but we are getting there! The problem with having so many people around working with you is to think about how you are going to get a clean shot afterward. A few tips to help you save some time in post-production: Do your best to have nothing in the way (Between your camera and model) Have your assistants operate outside your frame or on the side of the frame Same thing for your lights How to remove anything: A few other important questions you will have to answer fast: How do I light my scene? and what poses to choose for your models? You might consider backlighting your subject to make her and the fabric stand out! Have a light for the model and another one for the fabric. You can also place both lights from either side of the performer: Of course, if you only have one light, It can be placed directly above your head or on the side, camera right or left. If your light goes a bit too far on one side pay attention to the shadows created by your performer and how it falls on your fabric, it might give you unsatisfying results. For the pose, make it simple, I gave a few tips in my previous video on this particular subject. Just keep in mind that the bigger the fabric the more difficult it will be for your model to hold a difficult pose or to keep balance. The bigger also means the heavier the fabric, and the smaller she or he will be in the frame... So keep it simple and clear, to let the viewer understand what is actually going on in your picture. A few bonus tips: Visit the location before your shoot think about your shot and sketch ideas if necessary before your shoot. You will, of course, take multiple pictures, even if you think you nailed it the first time, make a few more! Then ask your model to walk out of the scene take a clean shot with nobody in it. This will allow you to fix things if needed in post with photoshop. So this is how I do it so far if you have ever tried to play with flying fabrics please share with us in the comments below how you do it!
- Opération Prêt à poster – La Poste
Il est désormais possible d’acheter son timbre-poste à l’effigie de Toulouse. La Poste lance, en partenariat avec l’Office de Tourisme, la première collection d’enveloppes Prêt-à-Poster illustrées par l’artiste-photographe Haze Kware. Ce dernier avait fait parler de lui en publiant en 2016 des clichés de danseuses du théâtre du Capitole dans des lieux emblématiques de la Ville rose. https://hkvisuals.com/toulouse-bts-photoshoots-vlog-14/ Les cinq photos choisies par La Poste mettent en scène des danseurs et artistes face à l’Hôtel-Dieu, sur la place Saintes-Scarbes, à la Cité de l’espace… Les timbres sont disponibles dans les bureaux de poste toulousains au prix de vente de 4,90 euros les 4 enveloppes timbrées. Le groupe La Poste souligne : Cette initiative locale offre la possibilité aux habitants et aux touristes de faire connaître des lieux emblématiques de la ville, de manière originale et artistique, à travers leurs échanges épistolaires. En parallèle, les photos de l’artiste-photographe Haze Kware seront également valorisées lors d’une exposition installée au sein du bureau de poste de Toulouse Capitole, du 29 juin au 15 septembre 2018. Hugues-Olivier Dumez Source : Actu Toulouse
- Take better photos – change your perspective and angles
This could be a game, your challenge, your homework. A way to open your mind and maybe escape from a routine. Basically, the idea is to get out of your comfort zone and force yourself to do things differently, to think differently, to question yourself... If you are the type of photographer that takes almost all its photos standing up facing your subject then this video is for you! Take your camera, a few lenses, if you are game take only one... head to your next photoshoot avoid shooting standing up. You have the opportunity to show the world in a different way. Stop making boring photos, tell a story, send a message... you want to make a powerful, epic picture? Get down, lay on the floor, and shoot from the ground. 5D Mark III + Canon 24 - 70mm mark II f2.8L 1/320s at f5 ISO125 - 24mm Valentina Pierini (Rome) I do this a lot because I like how some of my performers look powerful from that angle. Little bonus tip, shoot with a wide-angle lens to exaggerate that feeling. The viewer gets inside that intimate space, we feel the action... this works great with action sports photography: 5D Mark III + Canon 24 - 70mm mark II f2.8L 1/200s at f6.3 ISO100 - 24mm Katerina Ristic (Le Havre) 5D Mark III + Canon 24 - 70mm mark II f2.8L 1/200s at f7.1 ISO200 - 24mm Kevin Jacob (Lyon) Let's go further, let's go down a little bit more... how? The easiest way is to shoot on stairs or to shoot from a place somehow lower than where your model is standing. With stairs, you have incredible lines you can use easily for your composition and you can try several different heights. 5D Mark III + Canon 24 - 70mm mark II f2.8L 1/400s at f3.5 ISO125 - 59mm Dafne Lugui Barbosa (Toulouse) 5D Mark III + Canon 24 - 70mm mark II f2.8L 1/200s at f13 ISO100 - 24mm Vanesa Garcia (Montreal) I started experimenting this years ago like on these photoshoots made during my stay in Montreal in 2015: 5D Mark III + Canon 24 - 70mm mark II f2.8L 1/200s at f10 ISO100 - 24mm Eva Kolarova (Montreal) Want to go lower? I know it's hard to imagine, but it's possible if you have the opportunity to shoot through a transparent floor (Would love to do that!) or if you have a performer standing on top of you somehow or hanging from the ceiling. Then you can shoot with your back completely flat on the ground, your camera facing the ceiling... Of course, this won't happen a lot unless you often work with circus performers. 5D Mark III + Canon 16 - 35mm mark II f2.8L 1/200s at f3.5 ISO800 - 16mm Charlotte Lemay (Toulouse) 5D Mark III + Canon 24 - 70mm mark II f2.8L 1/125s at f2.8 ISO1000 - 39mm Karita Tikka (Toulouse) This lets you create mind-bending pictures especially when you are making tight shots, we wonder for a second how the shot was taken. With my bro Nhât, we experimented with this too many times! We got kicked out of this apartment and I often shoot from that angle when I photograph Chinese pole performers. 5D Mark III + Canon 24 - 70mm mark II f2.8L 1/50s at f3.2 ISO100 - 24mm Nhât Nâm Lê (Strasbourg) 5D Mark IV + Canon 24 - 70mm mark II f2.8L 1/320s at f5.6 ISO250 - 28mm Nhât Nâm Lê (Strasbourg) 5D Mark III + Canon 24 - 70mm mark II f2.8L 1/160s at f3.2 ISO100 - 53mm Nhât Nâm Lê (Strasbourg) Now, what about high-angle shots? This one can be tricky because it shortens the height of your model. Usually, performers, dancers don't really like this but it really depends on how you compose it. With these kinds of shots, you are dominating your subject so to minimize that effect I rarely ask my model to look straight at the camera, instead they look away or in an opposite direction. 5D Mark III + Canon 24 - 70mm mark II f2.8L 1/160s at f2.8 ISO640 - 24mm Anna Maria Mars (Mulhouse) 5D Mark III + Canon 16 - 35mm mark II f2.8L 1/200s at f2.8 ISO400 - 16mm Sara Renda (Bordeaux) On this one, I focused on the shadow created on the floor, and let Valentina improvise around different shapes. 5D Mark III + Canon 24 - 70mm mark II f2.8L 1/400s at f4.5 ISO160 - 55mm Valentina Pierini (Rome) Once you are familiar with that angle, go a bit further by getting close to that high vertical shot. Something I experimented first back in 2015 with the duo Charlotte & Nicolas: 5D Mark III + Canon 24 - 70mm mark II f2.8L 1/100s at f8 ISO320 - 41mm Charlotte & Nicolas (Montreal) And here is another simple one with Eloïze... 5D Mark III + Canon 24 - 70mm mark II f2.8L 1/200s at f8 ISO100 - 50mm Eloïze (Lyon) Of course, do not try all of these at once, try each one of them individually and pass to a different angle once you feel comfortable with it. You are building your vocabulary here so take your time... after a while, you will see much more opportunities to take photos, you will have more ideas and you might boost your love for the art along the way. If I had to summarize all this stop being lazy... Whenever I feel that things are easy, I question myself, maybe I am doing this wrong. Challenge, yourself, try new things, be creative, how do you step up your photo game, are you still trying to find new weird angles and perspectives? Let us know in the comments below.
- Smoke Grenades Fitness photoshoot
Behind the scenes video Feat. Ophélie Ferrand Back to the good old straightforward "Behind the scenes " video. No talking, straight to the point, and showing you what goes behind the lens on a photoshoot session with me! From the Carlton Pontoon to the Palais des Festivals I have been working more and more with Fitness models lately and never really had time to experiment with a few basic accessories on the first ones. Yes, there is nothing revolutionary in using Colored smoke in your photography, and it is tough and a real challenge to make something truly original and interesting these days. Usually, my sports pictures perform less than my dance work so I was surprised to see so many people react to the short Behind the scenes clip I posted the next day on my IG. This picture summarizes pretty much what I wanted to create, something epic, colorful, with a strong confident woman! The smoke had to be massive, and this is something I rarely see in other photographers' work, and now that I've tried, I understand why. These Smoke Grenades, last between 30 to 120 seconds, which is really short. Plus, the smell is strong, and you must use them outdoors or in an open space protected from the wind. I hate not having control and playing with these is a mess! I've worked with smoke machines before ( A new chapter !) and I've had mixed results. I haven't tried them all but it should happen soon. You have probably seen a few of my attempts with smoke grenades in the past, and one, in particular, happened in the same place we used for this one. We are in Toulouse, inside la Cartoucherie, not inside la "Grande halle" but in the "Petites halles" this time. I must thank the Staff of this amazing place and Pierre Olivier in particular for letting me create in this huge place. This place is great for smoke work because the wind is almost stopped by the remaining walls of these abandoned factories and the huge holes in the roof let the smoke escape. We had just enough time to try a few shots with flying fabrics again ( Make epic dance photos with flying fabrics! ). I had the chance to have a small team with me to help me manipulate the different props. I will go back on some of the techniques I used here in a near future, but for now, I leave you with my lighting setups and camera settings! After this session, I cannot imagine shooting fitness models without a few accessories! Huge thanks to my helping hands, Mélanie, Marion, and my loving partner Marlène. Have you ever used smoke in your work? How and why? Let me know! Will share with you a few more thoughts on this really soon, hope to have inspired some of you with this one.


![Create EPIC dance photos with flying fabrics [part I]](https://static.wixstatic.com/media/23a89e_cc31eabda1f34456b37168339f322615~mv2.jpg/v1/fit/w_176,h_124,q_80,usm_0.66_1.00_0.01,blur_3,enc_auto/23a89e_cc31eabda1f34456b37168339f322615~mv2.jpg)


